(Click on any picture for a larger version.)
HISTORY
Purchased in 1982 from a farmer/rancher in East Texas who had rolled it and put it back together, kinda... around the Tawakoni/Greenville area. I have no idea what I paid for it, I do recall that once I started inspecting all the systems I felt like I got ripped off. But it has been a good Jeep and accomplished all I asked of it.
It received a partial restoration, including a complete wire loom when a short melted much of the wiring. Everything worked when it was finally parked and stored (except no fuel gauge because of the home-made fuel tank w/o sender). I was afraid to take the body off at that time, afraid I couldn't afford to put it back together. I estimate at that time about a $3000.00 investment including purchase. It was my daily driver for close to three years. The scars from when it was rolled, and this repair, are still visible -- and will remain so. Those are the battle scars of an old farm Jeep that has done it's service and is getting a new lease on life.
I looked up the VIN in the production listing I found on the web. According the that, this Jeep was manufactured in 1959.
In the "before" photos, the body rust you see is all minor surface rust. I was in the middle of sanding the entire Jeep (3 coats of old paint, including a thick one someone brushed on) when I got a USG job that sent me overseas and I had to store it as is -- rattle can primer grey/red. I toyed with the idea of clear coating what you see, but talked myself out of it. The description below is what I found and repaired when I pulled the body off. A follow-on page describes the chassis repair.
BODY
There was rust-thru on the underside of the body (under the fuel
tank and tool box predominately, see tear down photos) and both rocker panels. And the rear
bed and cross member were significantly deteriorated, not to mention
the right rear where the spare tire once was. Note there was no bondo
used. The predominate scars still visible are the fenders and rocker panels.
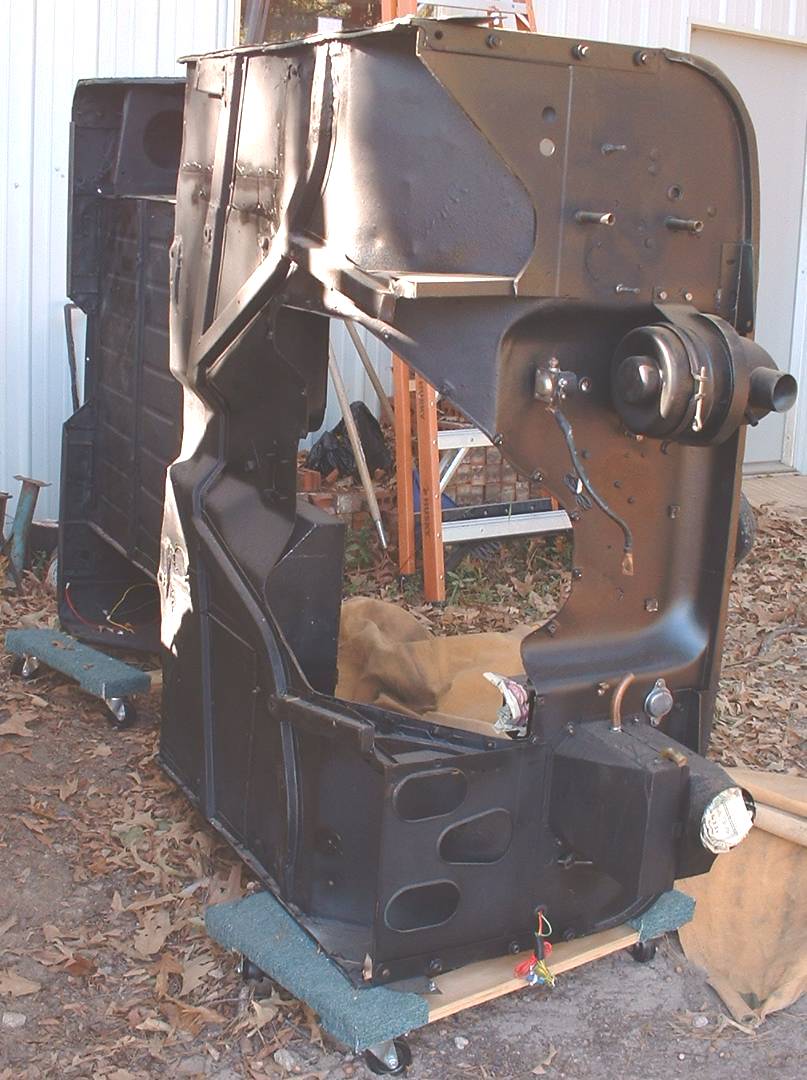
New sheet metal was brazed to the support channels as needed. The driver/passenger floors also received new sheet metal, a combination of riveting and brazing under the fuel tank and tool box. The rear of the body was reinforced and realigned with angle iron cut to approximate the original contour of the cross member under the tail gate, and to reinforce the rear body mount. The right rear fender well had flexed due to damage and did not come back into true alignment. The right rear corner dips about 1/2 inch below level. The photos above and below are of the finished body, except the exterior coat of paint has not been completed.
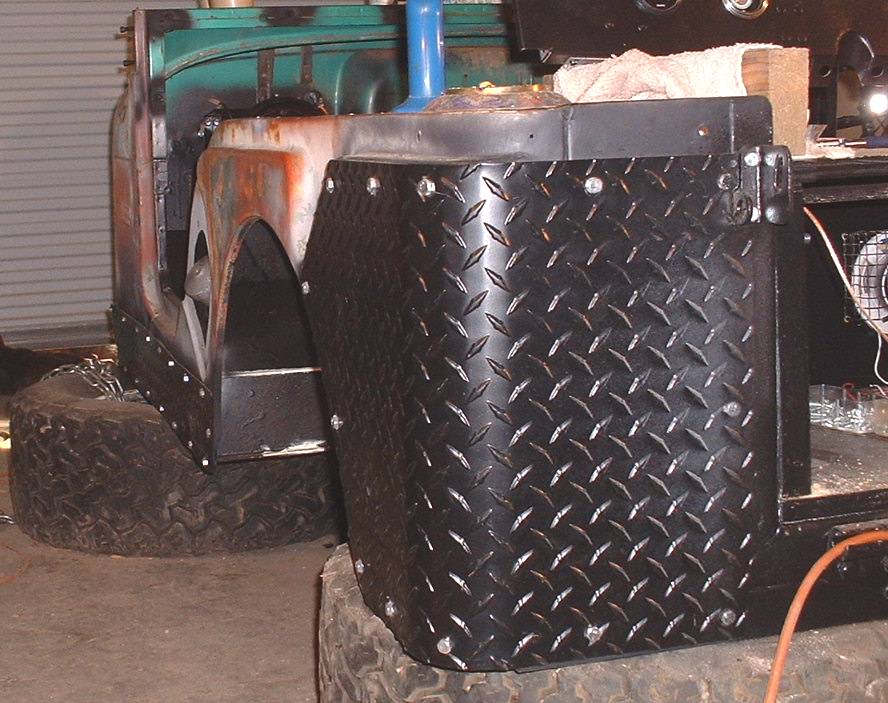
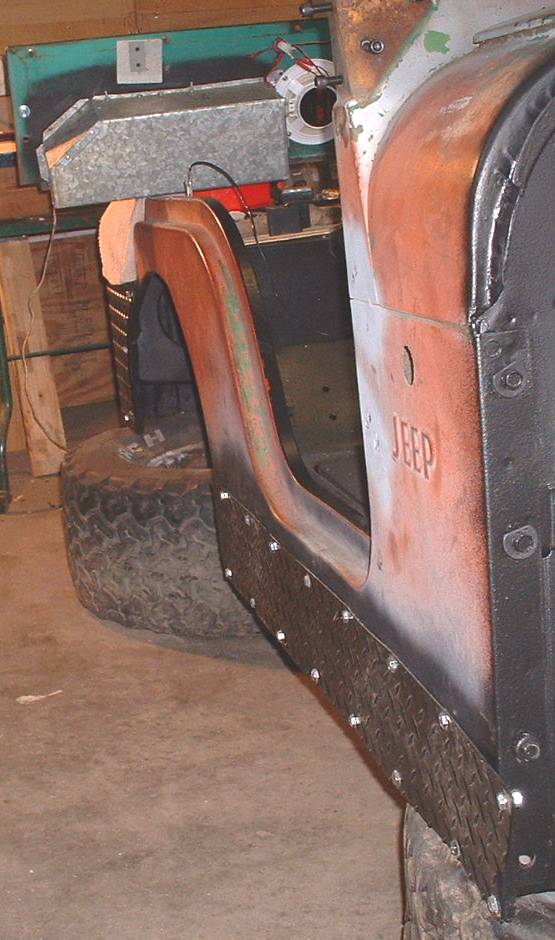
Aluminum diamond plate was installed on the rear corners and rocker
panels. These were bolted in place in order to follow the contour of
the body and for ease of removal in the future. These also cover the
worst of the scars from the body repair. The next Jeep will get
steel rockers and corners. I realized (too late) that aluminum is
much too soft.
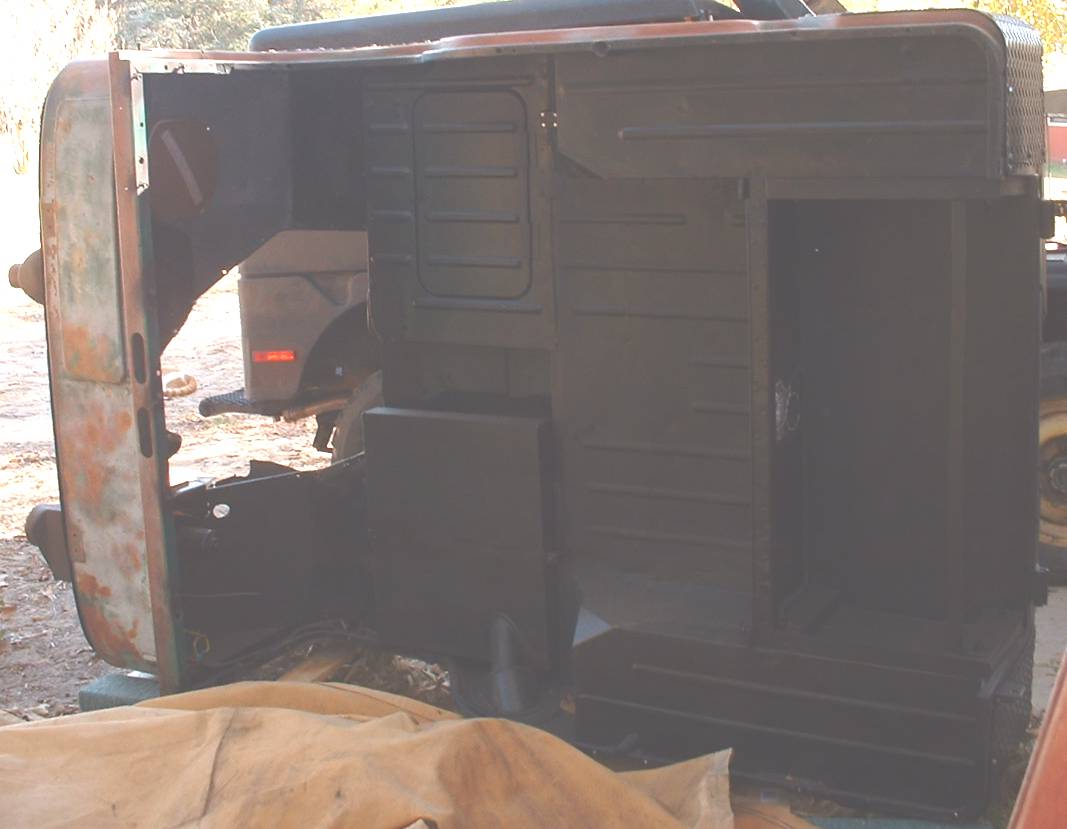
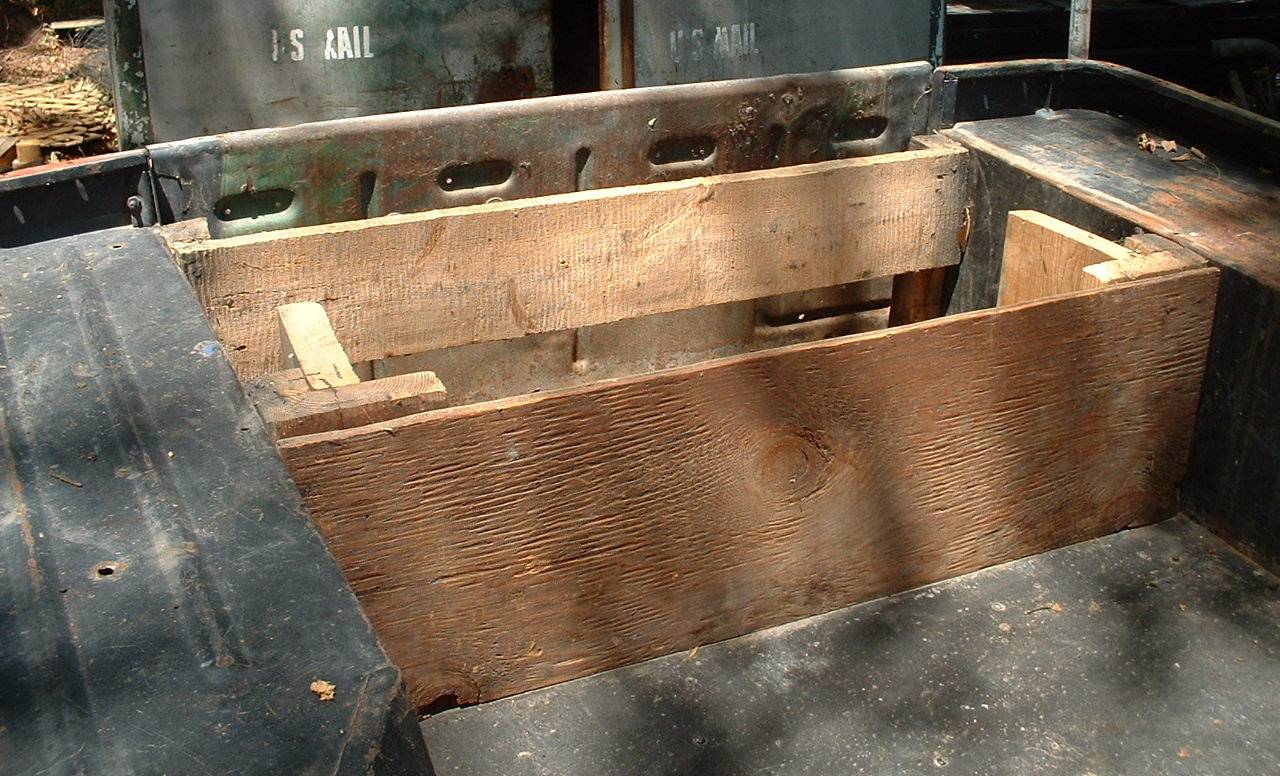
The rear seat/storage was redesigned and rebuilt. The seat back is attached to, and operates with, the tailgate. The seat bottom is attached to the hinged top of the storage box. The storage box was originally built to reinforce the rear of the Jeep. The new box frame was sealed with high quality rubberized caulk and finished with bedliner to match the interior. The seat has been recovered, along with custom cushions designed to fit the top of the wheel wells. The storage unit is not water tight for contents, but comes close. Although the tail gate is operational, with the spare tire and gas can mounted it will not fully open. Thus it has been bolted closed and the chains are in place.
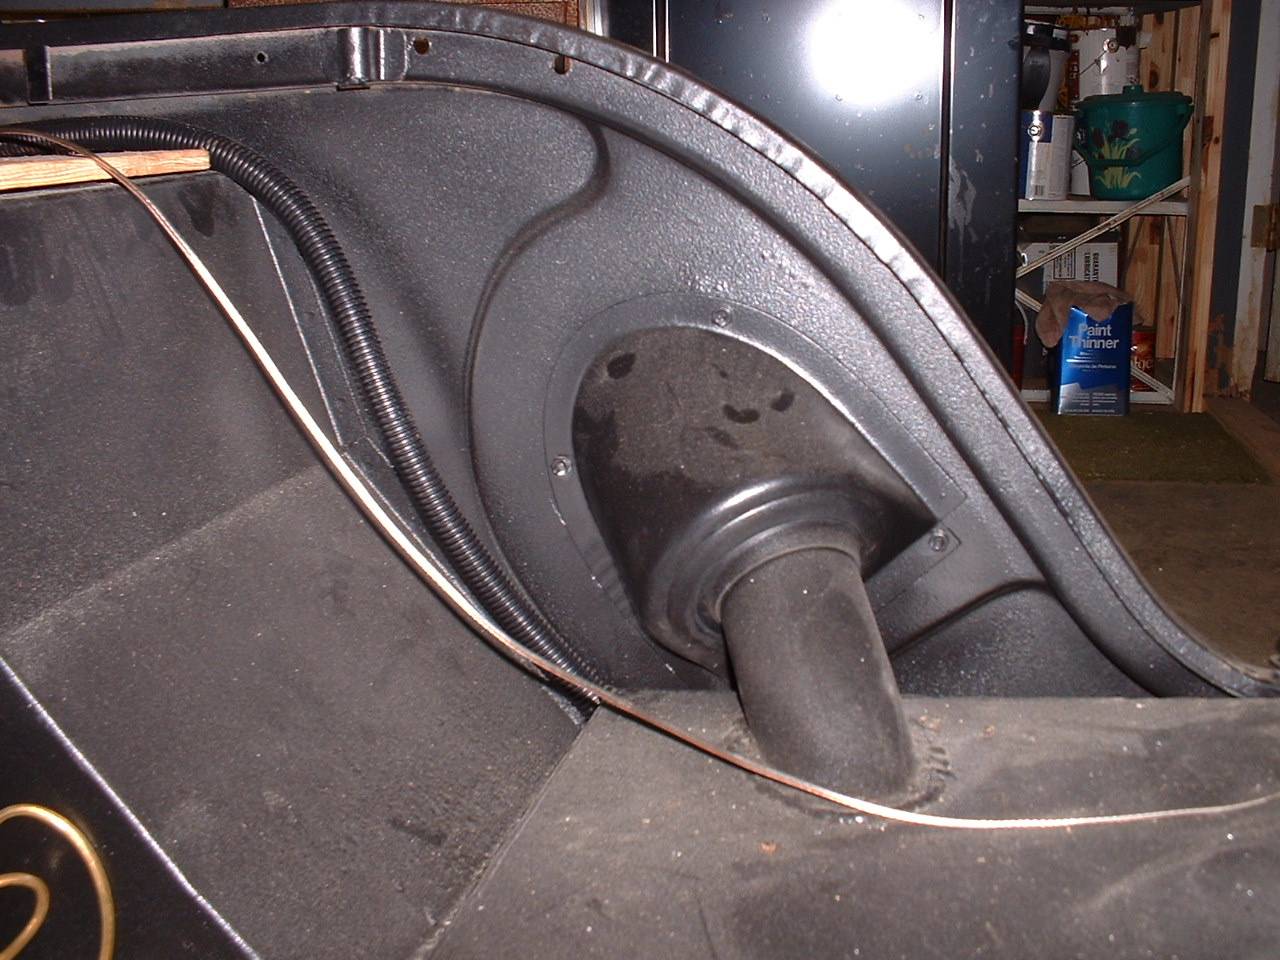
WINDSHIELD
The original windshield frame was in bad shape when I bought the Jeep. I reinforced the latches at that time. The basic problem was the reinforcements inside the defroster channel were shot, allowing the defroster vents to pull apart under the stress of latching the windshield. I discovered the vents were full of bondo and beat up pretty bad, thus I reinforced with metal strip across the entire length. Not pretty but very effective (the defroster was not and will not be operational anyway). The reinforcements for the latches were slightly modified and reinstalled, but the windshield will not latch tight. I also found holes that appear to have been for a spotlight. These were covered with a triangular patch.
FRONT FENDERS AND GRILL
I did not try to bang out the wrinkles in the fenders. I was
afraid to disturb the welds which have lasted over 20 years. They were
banged up pretty good long before me and represent the visible battle scars on the Jeep.
Not much had to be done to the grill. There is a slight bend that I could not totally straighten, but it does not effect the operation and adds character. I added an outlet for the tow harness and new welting on the top. The fenders and grill are solid.
HOOD
The hood was in good shape. All it required was prep and painting.
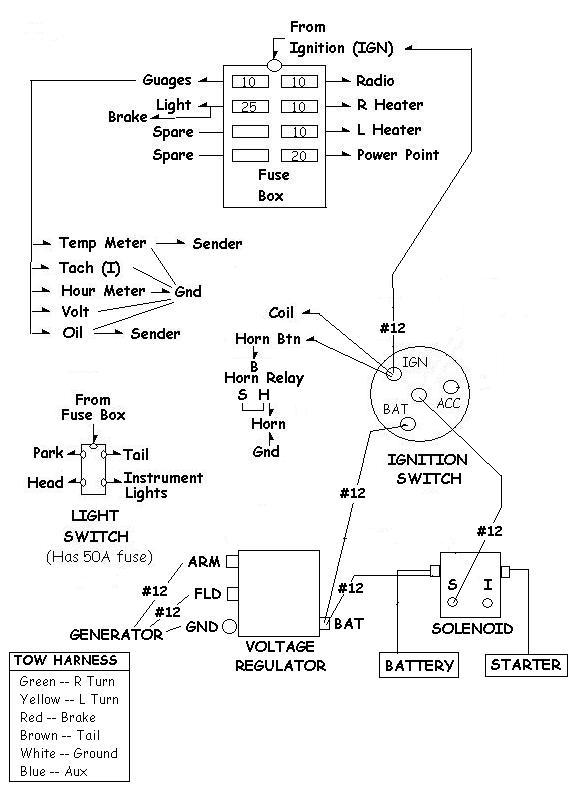
WIRING - FUSE BOX (Ref: Wiring Diagram)

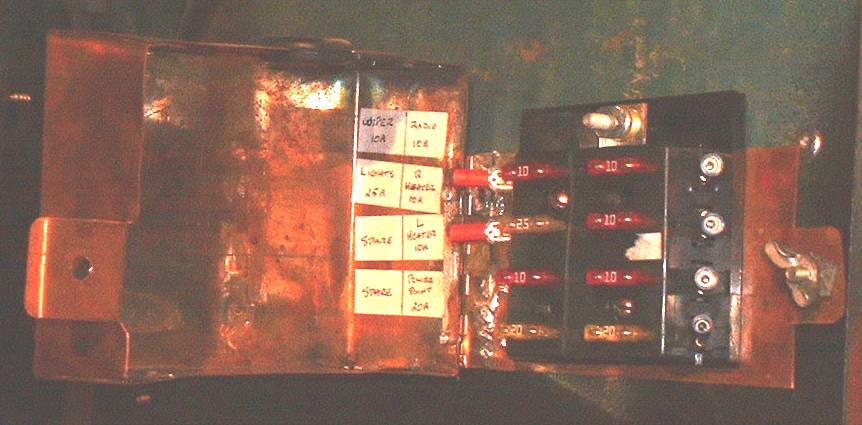
This is a Smittys Willys original. I built a custom fuse box
with 8 circuits (5 used, with main power switched
from the ignition). It's located on the inside firewall, above the
transmission cover. The old Willys design did not include a fuse
box -- in-line and component mounted fuses were the norm. In
fact, most cars before the early 60's did not have fuse boxes. I
remember spending many an hour at night under the dash looking at a web of wires for the in-line fuse that had blown.
The way the fuse box is wired, nothing will operate
without the ignition key (except the power point). Circuits are sized with reference to original
circuit specs, with the exception the light circuit is slightly larger
(extra 5 amps using 12 gauge wire) and the power point has an in-line
20 amp fuse (16 gauge wire, if you need to run something larger I recommend
you change the wire to 12 gauge and increase the fuse size). Note that
the fuse box cover is constructed from copper sheet. It is NOT water
proof so some care is required when washing out the Jeep. DO NOT spray
behind the dash board due to the potential for damage to circuit
components. All wiring followed the Willys wiring diagram, except the addition of this fuse box and as noted below.
WIRING - IGNITION (Ref: Wiring Diagram)
Battery (BAT) power is routed directly from the voltage regulator (BAT). Note that the horn is not on a fused circuit. In my experience, a fuse is not required, but I did install a horn relay.
WIRING - LIGHT SWITCH (Ref: Wiring Diagram)
Power to the lights is a 25 amp circuit from the fuse box. Note that the switch originally functioned as a circuit breaker and has a built-in fuse, in which I used a larger fuse (AGC50) since the circuit is controlled from the fuse box, and I did not want the switch fuse to be the first to blow.
Turn signals have not been installed. Turn signals were an option, and there's no evidence this Jeep had them. The tow wire harness does include turn signals (wired to the rear only), thus adding a signal switch would not be too difficult. The basic intent of this restoration was for off-road use only, for which turn signals are useless. If you must drive the Jeep on the street, use hand signals. That will drive the cops nuts.
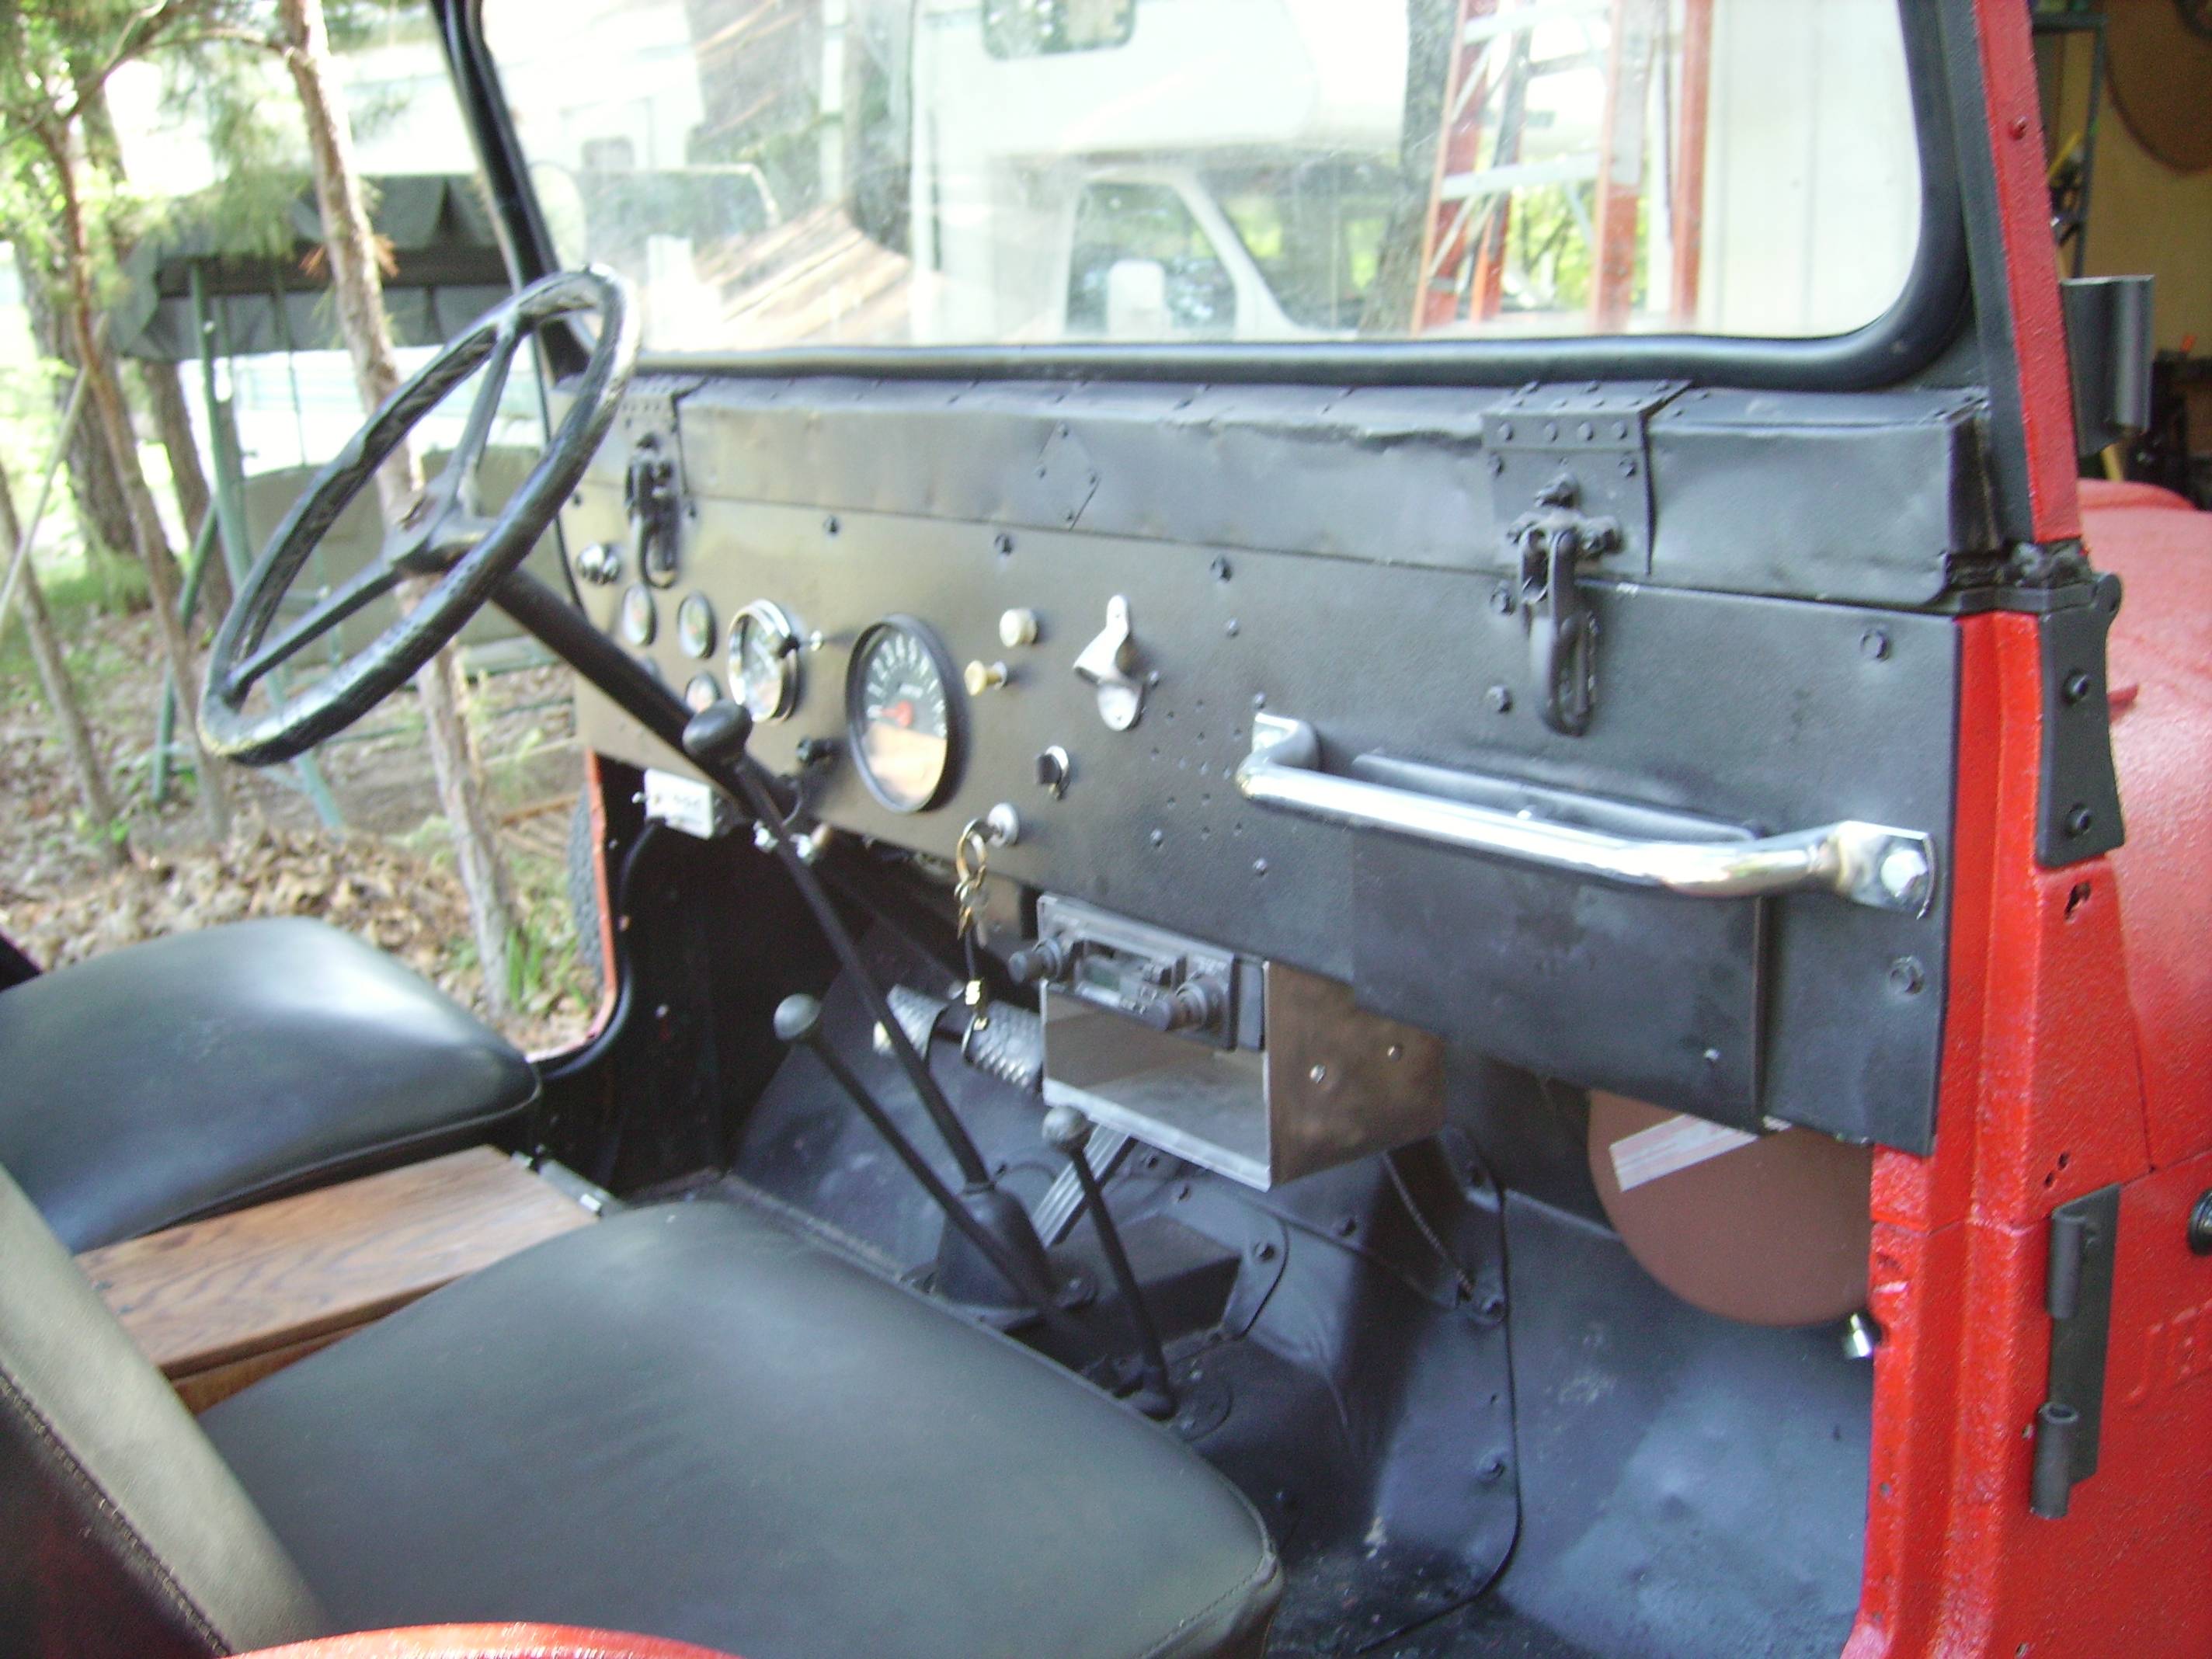
DASH BOARD

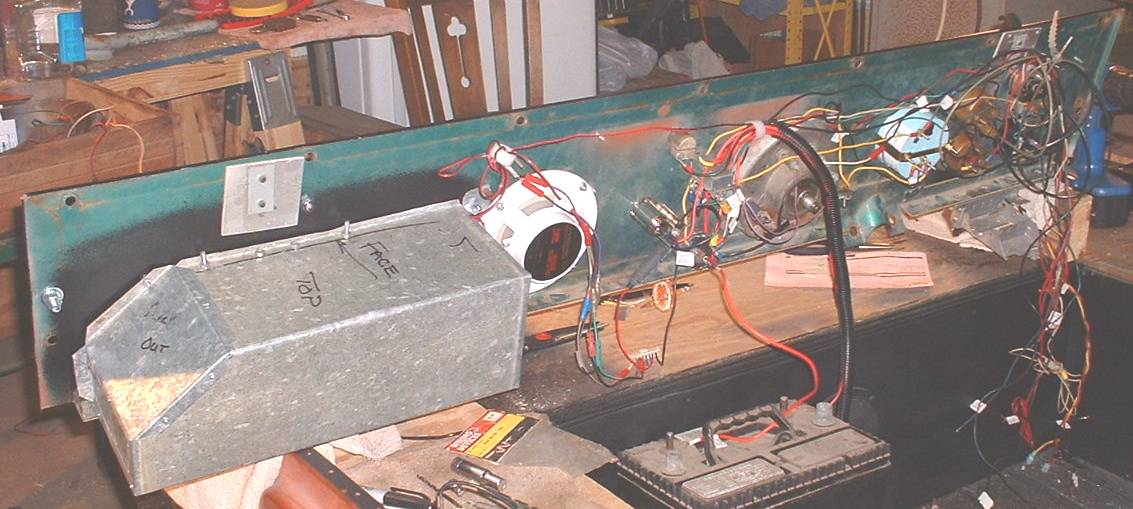
The dash board has been customized somewhat. Gauges were installed (originally in brackets hanging off the bottom). An hour meter was included because, in my experience, that is a more accurate measurement of usage than mileage (in essence, the old Jeeps were 4WD tractors with low RPM, high torque engines). The tachometer is a special low RPM tach. The rated HP of the F-head 4 cylinder is at 4000 RPM, but if you rev it to 4000 you might swear the engine is about to blow up. Thus the recommendation to limit revs to 3000 RPM. Remember, this Jeep creeps in 4 wheel low. It was not intended for high RPM usage.
The oversize glove box is custom built... another Smittys Willys original. Galvanized steel sheet was used (the same stuff they use to make household heating ducts). It will handle as much weight as you care to stuff into it.
The radio is installed in a custom stainless steel box braced under the dash board. Cutting a hole in the dash for a radio has never made sense to me, since you limit your options as soon as you do that. Worst case, installing a new radio will involve cutting a new metal sheet surrounding the radio inside the box (significantly easier than re-cutting the dash). The speakers are marine grade, 100 watt. One behind the dash, the other in the back seat.
While the dash was out I constructed the entire wire loom to make
it as close to plug'n'play as possible. I hate crawling under a
dash to work. This way I minimize the under-dash time. All
wires were labeled so final install was relatively painless. (In the end I
still had to drop the dash out twice. Once to install new guages
when I found the old ones were faulty, and again to install the
windshield hinge on the passenger side. Bugger.)
HEATERS
There are two heaters installed. The drivers
side is original to the Jeep. The passenger heater is from another
Willys (with original logo plate, I think from a station wagon). The
drivers side temperature is controlled by a cable that adjusts the
fresh air intake. It has a two speed fan controlled by a double throw
switch. The passenger heater (pictured above) recirculates and the fan
is controlled by
a rheostat on the dash board (the switch is new, the knob is the
original). Note that a defroster is not
installed. There was no evidence that there ever was one in this
Jeep.
FUEL TANK
COMMENTS
Welding -- Okay, I'll admit it. The MIG I bought kicked my butt. Then I find out that it's faulty due to it's Chinese ancestry... so the body got brazed into shape. And I will NEVER purchase the little 10 lb oxy/acetylene bottles ever again. Drove me nuts having to get gas every other day... a 60 mile trip from the boondocks where I live. Full size bottles are now on the tool list. Though my gas welds are not text book quality, they are effective. And one of the best investments I made was a hand grinder.
Next -- Phase 2: Chassis